
How to Build a Home Photography Studio (Even with No Experience)
Before we dive into choosing the right space for your home studio, I want to share a little of my own journey.
I’m incredibly grateful to live in a home that has several spaces where I could potentially film or photograph. But for a long time, something held me back—I didn’t feel like my home looked “studio-worthy.” With three young children, two of whom I homeschool, a perfectly styled and spotless house just isn’t my everyday reality.
When I decided to start taking photography more seriously, one of the biggest questions I kept asking myself was: Where am I actually going to shoot? Renting a studio isn’t always realistic, especially when you're building a business.
We’ve lived in our home for over six years, and during that time we’ve slowly been making upgrades room by room. Recently, I realized that our bedroom—one of the spaces I had been overlooking—had finally come together in a way that could work beautifully for filming and photography.
That realization shifted my perspective. Instead of waiting for the “perfect” studio, I started looking at the spaces I already had and asking how they could work for me.
Because the truth is, many photographers and content creators start exactly this way—using what they already have.
With a little creativity and thoughtful planning, spaces like bedrooms, garages, kitchens, and living rooms can become beautiful and functional studios.
So if you’ve been wondering whether your home could work as a studio too, here’s how to start evaluating the spaces you already have.
Step 1: Assess the Available Spaces
Start by evaluating the rooms or areas in your home that could realistically function as a studio. The goal is to find a space that offers enough room to work while supporting the type of photography or content you plan to create.
Bedroom Office
A bedroom office is one of the most common home studio setups. These spaces are typically smaller but can work extremely well for product photography, social media content, and brand photography.
Look for a room with a window that provides consistent natural light and enough space to place a tripod, lighting stand, and backdrop.
The benefit of using a bedroom is privacy and control—you can leave your setup in place without disrupting the rest of your home.
P.S.
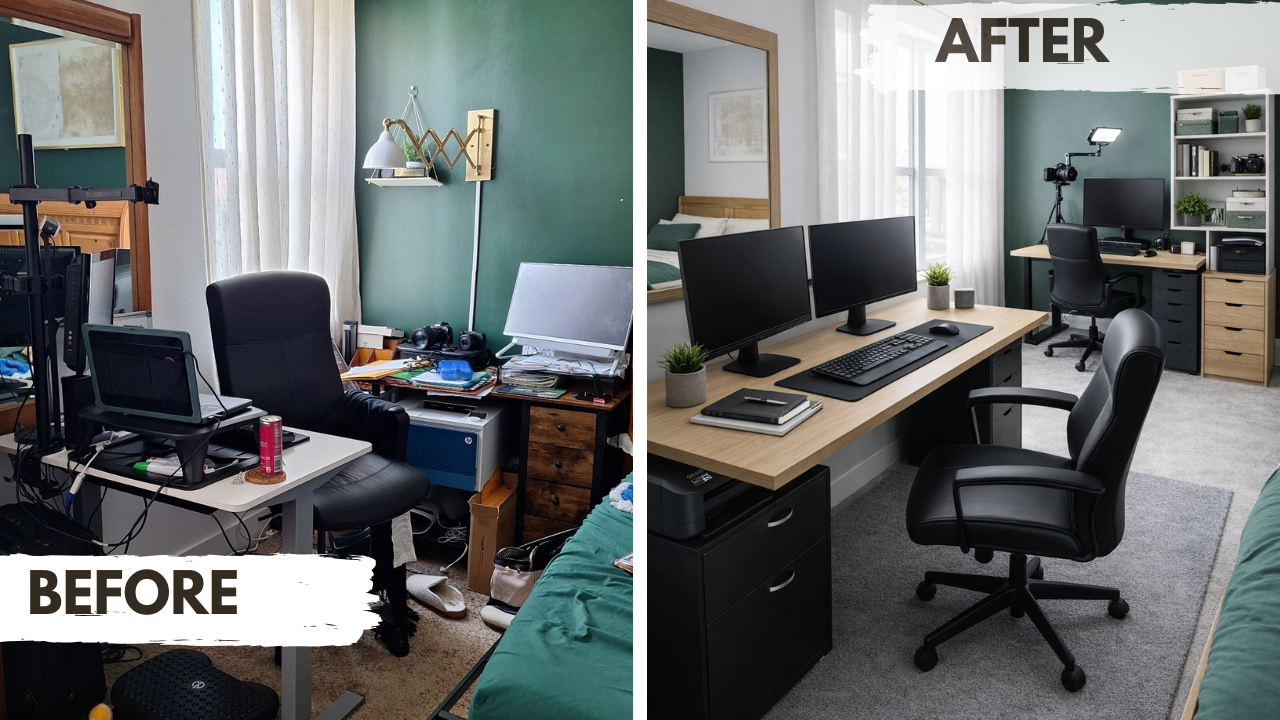
If your feeling stuck and still can’t see how to achieve your dream workspace, use Chatgpt! It has been such a great tool that helped me to see what the space could look like! The before picture is where my office space was and this is what the inspo after looks like! Simple, polished and premium.
Garage
Garages provide significantly more flexibility when it comes to studio setups. The extra square footage and higher ceilings allow room for larger lighting setups, backdrops, and even full set designs.
However, garages often require additional preparation such as insulation, proper ventilation, flooring, and controlled lighting.
If you plan to photograph groups, host styled shoots, or create larger content productions, a garage can easily transform into a powerful studio space!
Kitchen
Your kitchen can serve as a natural lifestyle studio. This space is perfect for cooking demonstrations, lifestyle photography, product shoots, and brand collaborations.
Kitchens often have beautiful window light and clean surfaces that can double as shooting areas. When using your kitchen as a studio, focus on keeping countertops clear and choosing simple backgrounds that don’t distract from your subject.
Because kitchens can be narrow, it’s important to plan your camera placement and workflow ahead of time.
Living Room
A living room offers a warm, comfortable setting that works well for lifestyle photography, branding sessions, interviews, and family portraits.
These spaces usually provide more visual interest through furniture, décor, and natural textures. Your couch, coffee table, or accent chair can easily become part of your scene.
When using a living room as a studio, consider rearranging furniture temporarily to create more shooting space and cleaner backgrounds.
Step 2: Consider Light Sources
Lighting plays a major role in determining whether a space will function well as a studio.
Before committing to a room, observe how light enters throughout the day.
Bedroom Office
Pay attention to where natural light enters the room and how strong it is during different times of day. Positioning your setup near a large window can provide beautiful soft light, especially during early morning or late afternoon.
Using curtains or blinds can help control the intensity when needed.
Garage
Most garages have limited natural light, which means you’ll rely more on artificial lighting such as softboxes, strobes, or LED panels.
If windows are present, test how the light falls in the space. Some photographers prefer garages because they offer complete lighting control.
Kitchen
Kitchens often have strong directional light from one or two windows. While this can create beautiful natural lighting, reflective surfaces like appliances, tile, and countertops may bounce light in unexpected ways.
Sheer curtains can soften harsh sunlight and help maintain balanced lighting.
Living Room
Living rooms usually feature multiple light sources including windows, lamps, and overhead fixtures.
Observe how natural light moves through the room during the day. This space can offer great ambient light for lifestyle photography, or you can add artificial lighting when needed.
Step 3: Check the Space Dimensions
Once you identify a potential room, measure the available space to ensure it can support your equipment and shooting style.
Bedroom Office
A small to medium-sized room can work well as long as you have enough room to move around your subject, camera, and lighting equipment.
Also consider whether you’ll be using backdrops or shooting against natural walls.
Garage
Garages typically provide more vertical and horizontal space, making them ideal for larger lighting setups, seamless backdrops, and creative sets.
Measure ceiling height as well as wall width to ensure you have enough room for stands, modifiers, and movement.
Kitchen
Kitchen layouts can sometimes feel tight. Check whether you have enough room to safely position your camera, tripod, and lighting without blocking walkways.
Kitchen islands and countertops can double as shooting surfaces for product or lifestyle content.
Living Room
Living rooms often offer more open floor space once furniture is rearranged. Evaluate whether you can temporarily move furniture to create shooting angles and background variety.
Also look for wall space if you plan to hang or install portable backdrops.
Final Thoughts
No matter the size or style of your home, creating a functional photography studio is possible with a little planning and creativity. By evaluating spaces like your bedroom, garage, kitchen, or living room, you can find the perfect spot to capture professional-quality photos and videos without renting an outside studio. Remember, it’s not about having a “perfect” home—it’s about making the most of the space you already have and working with the light and layouts available to you.
If you’re ready to take your home photography to the next level, start experimenting with your spaces today—and don’t forget to subscribe to my newsletter for tips, tutorials, and inspiration to create stunning content right from your home. Your perfect home studio is closer than you think!